Table of Contents
Digital Input
Digital input is something with only two states: ON or OFF. In the case of the Arduino, the ON state corresponds to an electrical voltage of 5V and OFF to a voltage of 0V. On the Arduino, we mainly use the digital PINs (D0-D13) for digital circuits. However, the analogue PINs can also be used as digital pins if more inputs or outputs are required.

Functions
The corresponding function for reading is:digitalRead (PIN);Reading out the value at the specified PIN.
In the following we will read in a button press with the Arduino. There are basically two options, which are illustrated here:
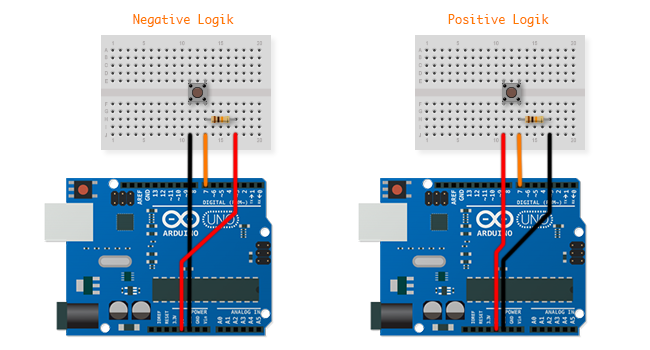
Negative or Positive Logic
The difference between negative and positive logic lies in the fact that with a negative logic the value at the digital pin is pulled to 0V (LOW) when the button is pressed. If the button is not pressed, however, a small current flows to 5V and pulls the value on the digital pin-up (HIGH). With positive logic, it's the other way around.
This so-called pull-up or pull-down resistors ensure that the voltage drops or increases when the button is not pressed. Without them, a lingering charge or interference might cause a false reading in the off state of the button.
One of the two logics can be used to read a button on the Arduino - both work in a similar way. The code is as follows:
const int BUTTON = 7; // The Button is on Digital Pin 7
const int LED = 13; // The LED is on Digital Pin 7

void setup()
{
  pinMode(BUTTON, INPUT); // Use the BUTTON pin as input
  pinMode(LED, OUTPUT); // Use LED Pin as output
}

void loop()
{
  digitalWrite(LED, digitalRead(BUTTON)); // Turn the LED on, when the button is pressed
}
Internal PullUp Resistor
Until now we have used an extra 10kOhm resistor to increase or decrease the voltage at the PIN when the button was not pressed. The microcontroller also has its own internal pull-up resistors that can be activated by programming. This method only works with a negative logic but is very convenient because only a button and no resistor is required. Internal PullUp is activated by calling the digitalWrite (pin, HIGH) function directly after calling pinMode () in setup ().
const int BUTTON = 2;

void setup()
{
  pinMode(BUTTON, INPUT_PULLUP);
}
Debounce
It can happen that the digitalRead () command is read too quickly in succession, resulting in several “bounces”. This can be avoided if we add something called debouncing. This works with the millis () function to remember the last time the button was pressed and to add a small delay.
const int BUTTON = 2;
const int LED = 13;

int ledState = HIGH;
int buttonState;
int lastButtonState = LOW;

long lastDebounceTime = 0;
long debounceDelay = 50;

void setup() {
  pinMode(BUTTON, INPUT);
  pinMode(LED, OUTPUT);
  digitalWrite(LED, ledState);
}

void loop() {
  int reading = digitalRead(BUTTON);

  // Reset debounce timer if state changed
  if (reading != lastButtonState) {
    lastDebounceTime = millis();
  }

  // If stable for debounceDelay time
  if ((millis() - lastDebounceTime) > debounceDelay) {
    // If button state actually changed
    if (reading != buttonState) {
      buttonState = reading;

      // Only toggle on button PRESS (not release)
      if (buttonState == HIGH) {
        ledState = !ledState;
        digitalWrite(LED, ledState);
      }
    }
  }

  lastButtonState = reading;
}
Exercises
1. Use a button to switch between two LEDs.
2. Write the code so that the change only takes place after pressing the button 3 times.
Further Information
Arduino: Digital Pins – Reference from Arduino.cc